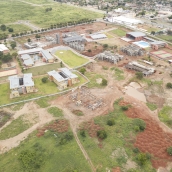
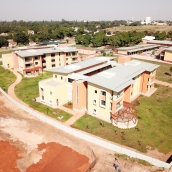
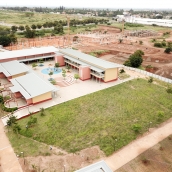
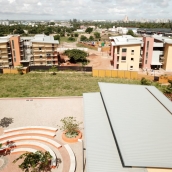
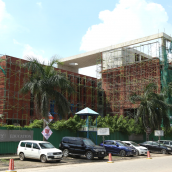
Campus Construction Diary
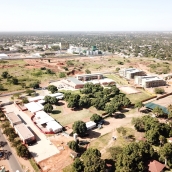
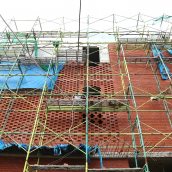
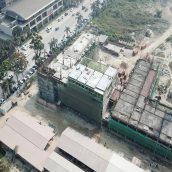
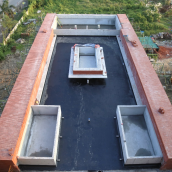
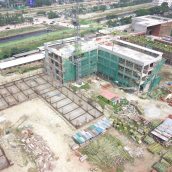
Construction of the Aga Khan Academy Maputo's new, purpose-built campus is underway! Visit this page regularly to see the progress of the construction.
January 2020
Click here to see the January 2020 construction photo gallery.
May 2019
Click here to see the May 2019 construction photo gallery.
March 2019
Click here to see the March 2019 construction photo gallery and video.
January 2019
Click here to see the January 2019 construction photo gallery and video.
November & December 2018
Click here to see the November & December 2018 construction photo gallery.
October 2018

Click here to see the October 2018 construction photo gallery.
September 2018

Click here to see the September 2018 construction photo gallery.
August 2018

Click here to see the August 2018 construction photo gallery.
July 2018

Click here to see the July 2018 construction photo gallery.
May 2018

Click here to see the May 2018 construction photo gallery.
January to April 2018 – Construction of the student residences
Click here to see the photo gallery showing the construction of the student residences.
December 2017 – Completed Junior School campus

Click here to see the photo gallery of the completed Junior School campus
November 2017

Click here to see the November 2017 construction photo gallery
October 2017

Click here to see the October 2017 construction photo gallery.
September 2017

Click here to see the September 2017 construction photo gallery
August 2017

Click here to see the August 2017 construction photo gallery
July 2017
Learn instrumentals and write your own songs - Eric Wainaina tells upcoming artistes.
KP Media Network speaks to Eric Wainaina, keynote speaker at the Class of 2019 graduation ceremony.
Drupal How To
Table of content
Apply a style to the main text
Index a page for search engines
Insert an "Article of interest"
Edit an existing photo gallery caption
Create a page that does not appear in the main menu but can be linked from another page
How to modify a video on a home page
Edit user roles and permissions
How to add new content
Click on the "Content" tab in the top navigation bar and then click on "Add Content".
On the page listing the different content types, click on "Basic page".
Fill the following fields:
Panoramic image: enter a panoramic image (576 x 210px, with rounded corners).
Body: This is the page main content, starting below the panoramic image and the page title. To edit this content content, go into the "Body" field. Make sure the Text format is set to "Full HTML" in the drop-down below the "Body" field. To apply the defined style to titles, highlight the title text and select "Heading 2" in the "Format" drop-down menu. Next to the "Body" field name, you can click on the "Edit summary" link to enter a summary for the page. This summary will be used to index the page. If you are pasting content from Word in the "Body" field, please use the "Paste from Word" icon: this will remove extra formatting to keep the text in plain Arial.
Academy name: Select under what Academy this page should appear.
In the bottom left list of links, click on "Menu settings". Check the "Provide a menu link" box. In the "Parent item", select the appropriate Academy section under the relevant Academy name.
In the bottom left list of links, click on "URL path settings". Uncheck “Generate automatic URL alias”. Then, in the “URL alias field”, enter a URL that starts with "general" for General Academies or that starts with the individual Academy name (for instance: "maputo/our-campus").
Click "Save" at the bottom of the page.
The new content will appear in the selected Academy section. If it is not in the right place, go to "Structure" in the top black navigation, then "Menu". Next to the Academy name, click "List links". Find the page you just created and use the handles to re-arrange the order. Please note that this uses a tree structure with different levels. Use the handles to put the page in the right section and order.
Log into the website Admin with your own account.
Once logged in, click on the"Admin list" menu in the top black menu.
Select the page you want to edit: you can filter the pages displayed by selecting a page "Type" or a "Taxonomy term" (recommended) from the drop-down menus. For instance, if you want to edit a page for Mombasa, select "Mombasa" in the "Has taxonomy term", and click on "Apply". This will list all pages for Mombasa. To access the page and edit it, click on the "Edit" link next to the page title.
This opens a page showing the various elements of the page, separated in various fields:
Panoramic image: this is the panoramic image going at the top of the page. If you want to delete the image, click on the "Remove" button.
Title: This is the page title.
Body: This is the page main content, starting below the panoramic image and the page title. To edit this content content, go into the "Body" field. Make sure the Text format is set to "Full HTML" in the drop-down below the "Body" field. To apply the defined style to titles, highlight the title text and select "Heading 2" in the "Format" drop-down menu. Next to the "Body" field name, you can click on the "Edit summary" link to enter a summary for the page. This summary will be used to index the page. If you are pasting content from Word in the "Body" field, please use the "Paste from Word" icon: this will remove extra formatting to keep the text in plain Arial.
Academy name: Select under what Academy this page should appear.
Click "Save" at the bottom of the page.
Apply a style
Select the text that you want to style. In the "Styles" drop-down menu, select the style you need.
Intro: grey italic text at the top of the page.
Quote: format for quote text.
Author: format for quote author text.
Click "Save" at the bottom of the page.
Insert a quote
Quotes can be added on pages that have a long text. On short pages, the use of quotes will alter the design of the page.
Go on the "Admin list" menu in the top black menu and open the page that should be indexed with the "Edit" link.
Type the text and the author in the same line, at the beginning of the paragraph where the quote should appear. If you are pasting content from Word in the "Body" field, please use the "Paste from Word" icon: this will remove extra formatting to keep the text in plain Arial.
Highlight the text of the quote and in the "Styles" drop-down menu, select "Quote".
Highlight the author of the quote and in the "Styles" drop-down menu, select "Author".
This will move the quote block to the left of the text.
Click "Save" at the bottom of the page.
Display issues: if the rendering looks wrong, check the source code (by clicking on "Disable rich-text" below the "Body" textarea). The quote formatting tags must be placed straight after the "<p>", and the closing "</p>" tag will be at the end of the paragraph of text. This is what the code should look like (any extra tag can be deleted):
<p><span class="quote">“Quote comes here.”</span><span class="author">Author comes here</span>Beginning of the paragraph comes here... </p>
Click on the "Content" tab in the top navigation bar and then click on "Add Content".
On the page listing the different content types, click on "Article".
Fill the following fields:
Title: enter the article title.
Image summary: upload an image that will be displayed next to the article summary, on the general "News" page.
Body: in the "Text format" drop-down menu, select "Full HTML". Enter your text in the "Body" field. If you are pasting content from Word in the "Body" field, please use the "Paste from Word" icon: this will remove extra formatting to keep the text in plain Arial. To apply the defined style to titles, highlight the title text and select "Heading 2" in the "Format" drop-down menu.
To insert an image in the article, place the cursor where the image needs to be added. Click the "Add media" icon (last one in the toolbar). Select the image you want to insert, with the browse button. Click "Submit". In the "Current format is" drop-down menu, select "Large". Enter a short photo caption in the "Description" field.
To add a page Summary that will be used by the News page listing various articles (and also by search engines), click on "Edit summary", next to "Body", and type in a summary.
Academy name: select an Academy name. If the news is a general one, select "General".
Date: enter the Article date, following the right format (mm/dd/yyyy).
In the bottom left list of links, click on "Menu settings". Check the "Provide a menu link" box. In the "Parent item", select "News" under the relevant Academy name.
Click "Save" at the bottom of the page.
How to index a page for search engines
For a good search engine indexing, page titles and description should be unique
Go on the "Admin list" menu in the top black menu and open the page that should be indexed with the "Edit" link.
In the page edit window, go at the bottom and click on the "Meta tags" link in the left column.
Description: By default, the description meta tag will be the summary used in the "Body" field. To edit the Summary, click the link next to the "Body" field title.
Keywords: enter a list of keywords
Title: By default, this will use the page title, a pipe sign and the general title "Aga Khan Academies".
Click "Save" at the bottom of the page.
Update a school calendar
Go on the "Admin list" menu in the top black menu and open the page that should be indexed with the "Edit" link.
Modify the text as needed. Make sure there is no empty space at the beginning of the cell by pressing the "Back" key. If empty spaces are left, the text will not be aligned properly. If you are pasting content from Word in the "Body" field, please use the "Paste from Word" icon: this will remove extra formatting to keep the text in plain Arial.
If you need to remove a row, place your cursor on the row and click the "Delete row" icon in the "Body" toobar (icon showing 2 white rows and a red row in between).
If you need to add a row, place your curor where you want to add the row and click the "Insert row before" or "Insert row after" icons in the "Body" toolbar (icons showing 2 white rows and a blue row above or after).
To add a month name, insert a row, hit return to create an empty line above the month name (so that it is not too close to the previous month) and type the month name. Highlight the month name and select "Heading 3" in the "Paragrah" drop-down menu, to apply a bold style and bigger typeface.
Click "Save" at the bottom of the page.
Edit drop-down menu text
In the top black navigation, click on "Structure" and then "Menu".
Next to the Academy menu you want to modify, click on "List links".
Next to the link you want to modify, click on "Edit".
Edit the "Menu link title" field as needed. Please keep the title short.
Click "Save" at the bottom of the page.
Insert an "Articles of interest"
In the top black navigation, go on "Content" and click "Add content".
Fill the following fields:
Title: enter the article title.
Body: This is the page main content, starting below the panoramic image and the page title. To edit this content content, go into the "Body" field. Make sure the Text format is set to "Full HTML" in the drop-down below the "Body" field. To apply the defined style to titles, highlight the title text and select "Heading 2" in the "Format" drop-down menu. Next to the "Body" field name, you can click on the "Edit summary" link to enter a summary for the page. This summary will be used to index the page. If you are pasting content from Word in the "Body" field, please use the "Paste from Word" icon: this will remove extra formatting to keep the text in plain Arial.
Image insertion in the body text: Place the cursor at the beginning of the paragraph where you want to place the image. Click on the "Add media" icon in the toolbar (far right). Upload the image (or select it from the "Library" tab if it already exists). Once uploaded, in the "Current format" drop-down menu, select "Preview". In "Description", enter the image caption. Click on "Submit". To add a caption, enter the caption text between the image and the first letter of the paragraph. Then select the caption only and in the "Styles" drop-down menu, select "Caption".
Newsletter reference: Enter the newsletter reference in the format "Newsletter n°1". This will be used to group the articles under the same article. Therefore it is important to have the reference written consistently.
Academy name: Select the Academy relating to the article.
In the bottom left list of links, click on "Menu settings". Check the "Provide a menu link" box. In the "Parent item", select "Articles of interest" under "<Main Menu>/News & Publications".
Click "Save" at the bottom of the page.
Click on "Content" in the Admin toolbar.
Click on "Add content > Gallery".
Enter a title and a description for the photo gallery (these will be used by search engines).
Select the number of columns ("4" in our case) and number of rows (this can be modified later).
Uncheck "Allow downloading of the original image", "Show media on a full page" and "Show title and description". Only "Show media in a lighbox" should be checked.
In "Academy name", select the relevant Academy.
In "Menu settings" (at the bottom, in the vertical menu), click on "Provide a menu link" and then link the gallery to the website (with "Parent item").
Click on "Save".
This opens the photo gallery page. To add images, click on the "Add media" link. Upload or select images from the Library.
The images uploaded or selected from the Library will appear on the page. To edit them, put your mouse on the image top right corner and click on the arrow to edit. You can then modify the title, description, etc.
Add as many images as necessary.
To edit an existing gallery, log in as an Admin and click on the top left "Home" icon in the toolbar. Go on the gallery page. As an Admin, this will give you access to the "Add media" link and the different edition tabs above the gallery.
Edit an existing photo gallery caption
Once logged in as an Administrator, go on the gallery web page (through the actual website, not through the "Admin list" or "Content" list - to access the website, click on the "Home" icon in the top left black navigation). Above the thumbnail images, click on the "Edit media" tab. Update the captions as needed.
Go on the "Admin list".
In the "Type" dropdown menu, select "Slideshow home" and click "Apply".
Click on the "Edit" link next to the slide you want to update.
Panoramic image: Leave as it is for an existing image, or replacing it with a new one if it needs to be changed. The image should be 940 x 360px, with rounded corners (20px radius in Photoshop). When cropping the image, bear in mind that the caption will come as an overlay on the image, and therefore make sure it is fine to have the right part of the image slightly hidden.
Title: This is the title that will appear above the caption, in upper and lower case. Keep it short.
Caption: This is the caption text. Keep it short.
Link text: This will be clicked to move to the next page. Square brackets will be added automatically. Therefore, simply type "Find out more".
Node reference: This is the page that will be called once the visitor clicks on "Find out more". Start typing the page title. Once it appears, highlight it to select it. When a title is correctly selected, it will appear in the "Node reference" box with its Node ID (ex: "introduction [nid:2]").
Taxonomy family: Link the slide to a general Academy or a specific one.
The rest of the form should not be modified.
Click on the top left "Home" icon to access the website.
Place your mouse over the footer column that you want to modify until you see the wheel icon and the arrow (at the right of the footer title).
Click on the arrow and select "Configure".
This opens the form where you can modify the information. You can modify "Block title", "Block description" and "Block body". Please do not change the other parameters.
Click "Save" at the bottom of the page.
The basic table html code should look like this:
<table>
<tr>
<td><strong>Title 1st column in bold</strong></td>
<td><strong>Title 2nd column in bold</strong></td>
</tr>
<tr>
<td>Text first column</td>
<td>Text second column</td>
</tr>
<tr>
<td><br /><strong>Second title 1st column in bold with visual space added above the line</strong></td>
<td><br /><strong>Second title 2nd column in bold with visual space added above the line</strong></td>
</tr>
</table>
Notes:
- <table></table>: tags that start and end the table
- <tr></tr>: tags that start and end the row
- <td></td>: tags that start and end the cell
- Put titles only in bold (wrapping the title between <strong></strong> tags).
- To avoid inserting blank cells/rows, simply add a <br /> tag to create an empty line above a title: this will add a blank line but will avoid creating an empty row or cell above this title.
- To modify the column width, update the top column cell as follows: <td width="50%"> or <td width="200px">
Click on the "Content" tab in the Admin toolbar.
Click on "Add content > Newsletter".
Fill the form as follows:
Title: title of the newsletter.
Language: select "English".
Body: enter a summary for the newsletter.
Image thumbnail: upload a thumbnail for the newsletter (172 pixels wide image).
Academy name: select the relevant Academy name.
File: upload the newsletter PDF.
Newsletter type: select the newsletter type under which the newsletter will appear on the Newsletters page.
Date: select the newsletter date.
Leave the other fields blank.
Create a new newsletter type
Newsletter types are generated using Drupal taxonomy: each newletter type is a term (for instance "MUN Journal"), linked to a "Vocabulary" (in this case "Newsletters").
To add a newsletter type, click on "Structure" in the top navigation.
Click on the "Taxonomy" link.
On the "Newsletters" line, click on the "Add terms" link.
In the form, enter the name of your new newsletter type.
Leave the other fields as they are and click on "Save".
When you create or edit a newsletter, the new term will appear in the "Newsletter type" drop-down.
Insert a large side picture
Large side picture can be applied on long pages. On short pages, use the thumbnail images.
Prepare the image so that it is 374px wide. Height is flexible. Apply a Photoshop 20px radius to the top and bottom right corners.
Insert the image within the text, at the beginning of a paragraph, low enough so that it does not overwrite the top left navigation.
In "Full html" mode, click on "Disable rich-text" to access the html code. Locate the image tag and modify the class so that it reads class="large-image..." (only the "image" class should be modified - leave the rest as it is).
Check the page to make sure the photo does not overwrite the menu and is not too high or too low on the page. If it is, go in source mode, select the entire image tag and move it to a different location.
Create a page that does not appear in the main menu but can be linked from another page
Click on the "Content" tab in the Admin toolbar.
Click on "Add content" and select a content type (for instance "Basic page").
Enter a "Title" and a "Body" text.
Select an Academy.
In the bottom left menu, under "Menu settings", make sure "Provide a menu link" is unchecked.
In "URL path settings", uncheck “Generate automatic URL alias”. Then, in the URL alias, type a URL for that page (in lower case, with no spaces), including the Academy name (for instance “maputo/dummy-page”).
Click on "Save".
Use the URL that was entered in "URL path settings" to create a link to this page (ex: "maputo/dummy-page").
How to edit a webform
Go on the "Admin list" tab in the top navigation.
Select the content type "Webform" to display all webforms.
Edit the webform you want to modify.
The page will display several tabs in the top right corner. The "Edit" one allows you to update the form title and introduction/body text, when they exist.
Make your modifications to the "Edit" page and click "Save".
If you need to update the form itself, click on the "Webform" tab (in the top right corner). This will display the various existing fields. To edit them, click on the "Edit" link.
To modify the e-mail address of the recipient, go on "Webform" and click on the "E-mails" link below the top right tabs. Click on the "Edit" link to modify the e-mail.
How to post a video
Have the video uploaded on the Brightcove video server (Ayaz to upload the video for you).
Once the video is uploaded, get the "Quick publish" code (Ayaz to provide you with it).
In Drupal, click on the "Content" tab and add a new "Video" content type.
Fill the form as follows:
Title: enter a title for the video.
Academy name: select the Academy name for the video.
Video code: paste the code provided by Brightcove. Make sure the "Text format" is set up to "Code". It should look like this:
<div style="display:none">Video presented by the Aga Khan Academies</div>
<script language="JavaScript" type="text/javascript" src="https://www.agakhanacademies.org/%3Ca%20href%3D"http://admin.brightcove.com/js/BrightcoveExperiences.js">http://admin.brightcove.com/js/BrightcoveExperiences.js"></script>
<object id="myExperience1715924728001" class="BrightcoveExperience">
<param name="bgcolor" value="#FFFFFF" />
<param name="width" value="340" />
<param name="height" value="190" />
<param name="playerID" value="648717932001" />
<param name="playerKey" value="AQ~~,AAAAlwpybYk~,Oor7wWdAhP7InRlo2x7X9FBFx6m9DFZ_" />
<param name="isVid" value="true" />
<param name="isUI" value="true" />
<param name="dynamicStreaming" value="true" />
<param name="@videoPlayer" value="1715924728001" />
</object>
Important notes on the video code:
- The original code provided by Brightcove contains adverstising and extra tags which we don't need. You can delete them to get the same structure as indicated above.
- The above code is a sample: each video has a unique reference. When inserting a new video, some of the param <param> values below will be replaced with the new video's ones. Dimensions and background color should stay as above.
- In the code below, you will need to replace the "Video presented by..." text so that it features "Aga Khan Academies" (the code sent from Brightcove may indicate "AKDN").
Date: select the video date.
Leave the other fields as they are by default.
Click on "Save".
How to modify a video on a home page
Click on the "Home" icon in the top black navigation bar. Go to the page where you want to edit the video. Place your mouse over the top right corner of the block that contains the video and click on "Configure block".
In the "Block body" field, modify the code as per instructions on "How to post a video". Make sure the "Text format" is set up to "Code".
Leave the other fields as they are by default.
Click on "Save block".
Edit User roles and permissions
The management of the user roles and permissions has serious security implications. It is possible to access the settings for the Admin and the Master Editors.
Create a new user:
In the top navigation, click on the "People" tab.
Click on "Add user".
Enter a user name and an e-mail address (all e-mail addresses need to be unique - this address will be used to send an invitation to the new user).
Enter a strong password and confirm it.
Check "Active" for the "Status".
In the "Roles" list, select the role for the new user (each "Role" has specific persmissions).
Check the "Notify user of new account" so that the new user receives an invitation to activate account.
Click on "Create new account".
Edit an existing user:
In the top navigation, click on the "People" tab.
Click on the "Edit" link for the User you want to modify, in the right column.
Modify the User name or e-mail address.
Please note that the "Password" will be blank for security reasons.
In the "Roles" list, select the role for the new user (each "Role" has specific persmissions).
Click on "Save".
Edit the "Permissions":
Permissions let you control what users can do and see on your site. You can define a specific set of permissions for each role.
In the top navigation, click on the "People" tab.
In the top right corner, click on "Permissions".
This will display a list of all permissions for the admin and content of the website.
The "Administrator" role should be able to do everything.
The "Master Editor" should be able to do everything, apart from manipulating views and the website structure itself.
The other roles should have limited permissions.
To add a permission, check the checkbox on the permission line you are interested in.
Define "Roles":
Permissions let you control what users can do and see on your site. You can define a specific set of permissions for each role.
In the top navigation, click on the "People" tab.
In the top right corner, click on "Roles".
Edit an existing role by clicking on "Edit role" or "Edit permissions" on the line of the Role you are interested in.
If you need to create a new role, type a name for that role in the bottom field and click "Add role". This should be used if you want to create a role to modify only spotlights, for instance.
Once a role is created, set up its permissions.
Click on "Save".

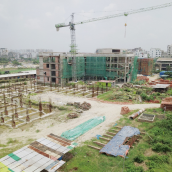
AKA Dhaka Campus Construction Diary
Construction of the Aga Khan Academy Dhaka's award-winning new campus is underway. Visit this page regularly to see how construction is progressing.
July 2019
Click here to see the July 2019 construction photo gallery.
June 2019
Click here to see the June 2019 construction photo gallery.
January 2019
Click here to see the January 2019 construction photo gallery.
December 2018

Click here to see the December 2018 construction photo gallery.
November 2018
October 2018

Click here to see the October 2018 construction photo gallery.
September 2018

Click here to see the September 2018 construction photo gallery.
August 2018

Click here to see the August 2018 construction photo gallery.
July 2018

Click here to see the July 2018 construction photo gallery.
June 2018

AKA Dhaka Campus Construction Diary
Construction of the Aga Khan Academy Dhaka's award-winning new campus is underway. Visit this page regularly to see how construction is progressing.
December 2019

Click here to see the December 2019 construction photo gallery.
November 2019
Click here to see the November 2019 construction photo gallery.
October 2019
Click here to see the October 2019 construction photo gallery.
September 2019
Click here to see the September 2019 construction photo gallery.
August 2019
Click here to see the August 2019 construction photo gallery.
July 2019
Click here to see the July 2019 construction photo gallery.
June 2019
Click here to see the June 2019 construction photo gallery.
January 2019
Click here to see the January 2019 construction photo gallery.
December 2018
Click here to see the December 2018 construction photo gallery.
November 2018
October 2018
Click here to see the October 2018 construction photo gallery.
September 2018
Click here to see the September 2018 construction photo gallery.
August 2018
Click here to see the August 2018 construction photo gallery.
July 2018
Click here to see the July 2018 construction photo gallery.
June 2018
KITE 2016 Photo Gallery
See the kite flying action during KITE 2016 in the photo gallery below.


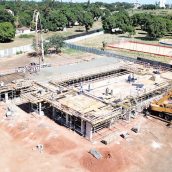
Aga Khan Academy Maputo construction August 2017
Photo gallery showing the construction of the Aga Khan Academy Maputo – August 2017


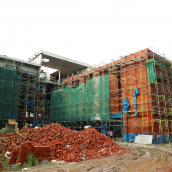
Aga Khan Academy Maputo construction September 2017
Photo gallery showing the construction of the Aga Khan Academy Maputo – September 2017


AKA Maputo construction November 2017
Photo gallery showing the construction of the Aga Khan Academy Maputo – November 2017